


$66 DIY Bullnose Quartz, or Granite Counter Freehand with an Angle Grinder
- Sep 30, 2017
- 2 min read
I'lI show how I fabricated a DIY laminated countertop edge (making the countertop appear twice as thick). And how I created Using tools costing $66.
If you don't like to read, and want to get to the point, here's my video on how I did it!
What I used:
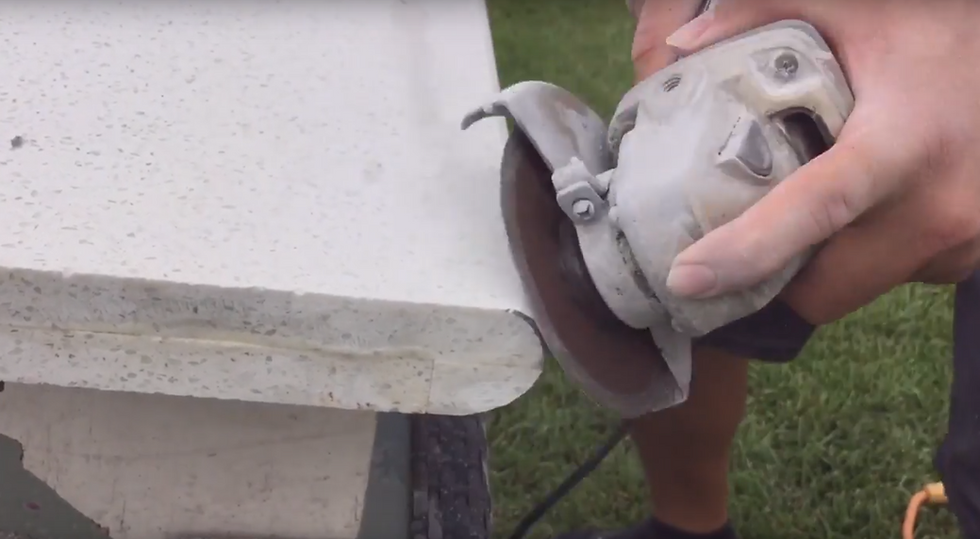
1. A continuous rim 4" or 4.5" diamond blade. http://amzn.to/2wNYv1d
2. A 4.5" angle grinder. http://amzn.to/2yfShr4
3. Clamps (appx 1 clamp for every 1-2 feet of bullnose. Amazon http://amzn.to/2yf19NX
4. Clear epoxy. 1 tube for every 4 feet of bullnose. Amazon http://amzn.to/2xJR5cr.
Technique:
I cut a 1.5" wide strip of countertop using a circular saw. The strip was used to double up the countertop edge. To see how I cut this strip, click here.
I Measured out the required length of each strip, then added 1/2cm as leeway when trimming it down for a perfect fit.
Using the angle grinder with the diamond blade, I trimmed each strip down, and "dry fit" it on the slab to ensure a tight fit between each piece.
I marked each piece so I knew instantly where each strip belonged and its proper orientation.
Using the angle grinder, I lightly dragged the blade over the surfaces to be bonded. This will roughened up the surface for better adhesion. Never "push" the blade, or it will bite into the surface and create a divot.
Wiped all surfaces to be bonded with soapy water and let dry.
Mixed the epoxy and applied a thin layer on both surfaces to be bonded. A popsicle stick to spread will work. I used scrap pieces of vinyl fence.
Clamped the strip down as firmly as I could to make the seam as invisible as possible.
I wiped the excess epoxy from the seam, and let the epoxy set for a few hours.
For a Square Eased Edge:
I dragged the angle grinder with diamond blade lightly over the edge with long strokes with consistent pressure. My goal was to even out any rough and uneven areas. Don't worry about fine ridges or swirls. The polishing step will remove those.
For a Bullnose:
A bullnose edge is basically a perfect half circle when viewed from its profile.
I used a compass to mark a half circle on the corner of the laminated edge.

Then colored in the area outside the circle with a felt tipped pen.

I Placed duct tape on the top surface along the edges to protect the factory finished surface from accidental damage from the angle grinder.
I dragged the diamond blade from one corner to the other along the edge using consistent pressure. With each stroke I slowly removed the colored area until the edge had a bullnose shape. There were long flat lines from the angle grinder, but those were removed with the polishing step.
The imperfections are more visible on the corners, so I spent extra time perfecting them.
The next step is to polish the edges: https://www.youtube.com/watch?v=Rp6cHue_70Q

Comments